Table of Contents
ToggleHow to Set Up Adjust for iOS and Android Apps (2026)
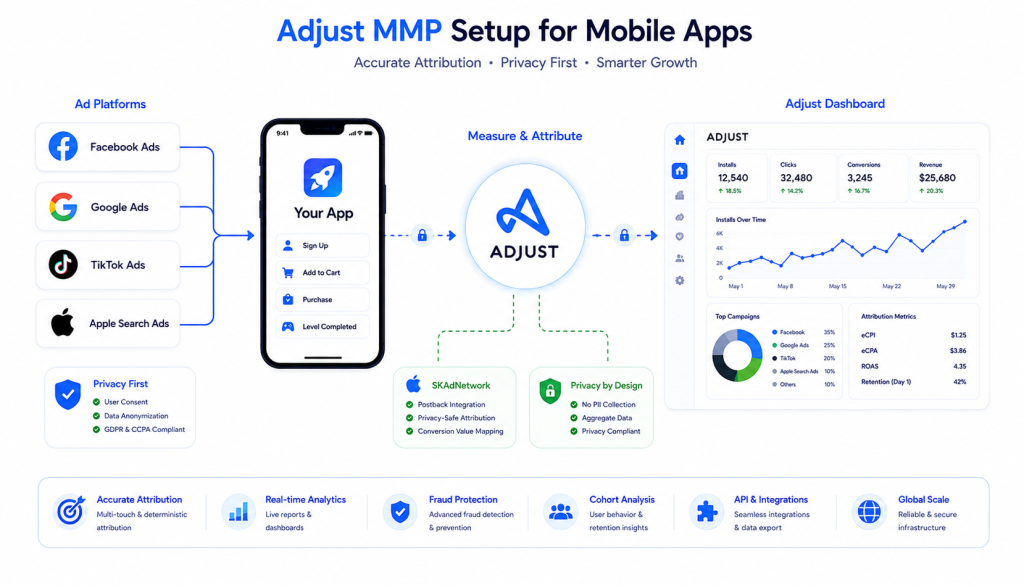
Adjust is one of the most widely used Mobile Measurement Partners (MMPs) — trusted by thousands of apps globally for accurate attribution, fraud protection, and privacy-compliant measurement.
But setting up Adjust correctly is where most teams struggle. A wrong SDK initialization, missing postback configuration, or incorrect event mapping can silently break your entire attribution pipeline.
This complete Adjust setup guide walks you through everything — from account creation to SDK integration, event tracking, deep links, SKAdNetwork configuration, and ad network connections.
In this guide:
- What Adjust does and why mobile apps need it
- How to create and configure your Adjust account
- iOS SDK setup with ATT and SKAdNetwork
- Android SDK setup with GAID
- Custom event tracking
- Deep link configuration
- Ad network integrations
- How much does Adjust cost?
- How to validate your Adjust setup
What Is Adjust and Why Use It?
Adjust is a Mobile Measurement Partner (MMP) that tells you exactly which ad campaigns, networks, and creatives are driving installs, events, and revenue in your app.
Why use Adjust:
- Privacy-first attribution built for ATT and SKAN 4.0
- Clean, intuitive dashboard — easier to use than most MMPs
- Raw data access on all plans
- Transparent, predictable pricing
- Strong fraud protection via Unbotify
- Trusted by 50,000+ apps globally
Adjust vs AppsFlyer quick comparison:
| Feature | Adjust | AppsFlyer |
|---|---|---|
| Dashboard | Clean, intuitive | Feature-rich, complex |
| Raw data access | All plans | Higher tier only |
| Pricing | Transparent, flat-rate | Install-based, scales fast |
| Fraud protection | Unbotify (solid) | Protect360 (industry-leading) |
| Ad network integrations | 2,000+ | 10,000+ |
| SKAN 4.0 support | Strong | Advanced |
Step 1 — Create Your Adjust Account
- Go to adjust.com
- Click “Get Started”
- Enter your company details
- Verify your email
- Log in to the Adjust dashboard
Add your app:
- Dashboard → “New App”
- Select platform (iOS or Android)
- Enter your app name and store URL
- Click “Add App”
Important: Create separate Adjust apps for iOS and Android. They have different App Tokens and settings.
Step 2 — Get Your App Token
Your App Token is the unique identifier that connects your app to Adjust.
- Dashboard → App Settings
- Copy your App Token
- You’ll need this for SDK initialization
Step 3 — iOS SDK Setup
Install Adjust iOS SDK
CocoaPods:
pod 'Adjust', '~> 4.38.1'Swift Package Manager:
- Xcode → File → Add Packages
- Enter:
https://github.com/adjust/ios_sdk
Configure ATT Permission
Add to Info.plist:
<key>NSUserTrackingUsageDescription</key>
<string>This helps us provide you with a better experience and measure ad performance.</string>
Initialize Adjust iOS SDK
import Adjust
import AppTrackingTransparency

@main
struct MyApp: App {
    init() {
        let adjustConfig = ADJConfig(
            appToken: "YOUR_APP_TOKEN",
            environment: ADJEnvironmentProduction
        )
        adjustConfig?.logLevel = ADJLogLevelVerbose
        Adjust.appDidLaunch(adjustConfig)
    }

    var body: some Scene {
        WindowGroup {
            ContentView()
                .onAppear {
                    // Request ATT permission
                    if #available(iOS 14, *) {
                        ATTrackingManager.requestTrackingAuthorization { status in
                            // Adjust handles IDFA automatically after permission
                        }
                    }
                }
        }
    }
}
Critical: Always request ATT permission before or immediately after SDK initialization.
Add SKAdNetwork IDs
Download the latest SKAdNetwork IDs from Adjust and add to Info.plist:
<key>SKAdNetworkItems</key>
<array>
    <dict>
        <key>SKAdNetworkIdentifier</key>
        <string>v72qych5uu.skadnetwork</string>
    </dict>
    <!-- Add all Adjust provided IDs -->
</array>
Step 4 — Android SDK Setup
Add Adjust to build.gradle
App-level:
dependencies {
    implementation 'com.adjust.sdk:adjust-android:4.38.1'
    implementation 'com.android.installreferrer:installreferrer:2.2'
    implementation 'com.google.android.gms:play-services-ads-identifier:18.0.1'
}
Add Permissions to AndroidManifest.xml
<uses-permission android:name="android.permission.INTERNET" />
<uses-permission android:name="android.permission.ACCESS_NETWORK_STATE" />
<uses-permission android:name="com.google.android.gms.permission.AD_ID" />
Initialize Adjust Android SDK
import com.adjust.sdk.Adjust
import com.adjust.sdk.AdjustConfig

class MyApplication : Application() {
    override fun onCreate() {
        super.onCreate()

        val adjustConfig = AdjustConfig(
            this,
            "YOUR_APP_TOKEN",
            AdjustConfig.ENVIRONMENT_PRODUCTION
        )
        adjustConfig.setLogLevel(LogLevel.VERBOSE)
        Adjust.onCreate(adjustConfig)
    }
}
Important: Initialize in Application class, not in Activity.
Step 5 — Track Custom Events
Custom events are the core of your attribution data. Every meaningful user action should be tracked.
First, create events in the Adjust dashboard:
- Dashboard → Your App → Events
- Click “Create Event”
- Name your event (e.g., “purchase”, “registration”)
- Copy the Event Token
iOS (Swift):
// Registration
let registrationEvent = ADJEvent(eventToken: "abc123")
registrationEvent?.addCallbackParameter("method", value: "email")
Adjust.trackEvent(registrationEvent)

// Purchase
let purchaseEvent = ADJEvent(eventToken: "def456")
purchaseEvent?.setRevenue(29.99, currency: "USD")
purchaseEvent?.setTransactionId("order_12345")
Adjust.trackEvent(purchaseEvent)

// Custom event
let customEvent = ADJEvent(eventToken: "ghi789")
customEvent?.addCallbackParameter("plan_type", value: "premium")
Adjust.trackEvent(customEvent)
Android (Kotlin):
// Registration
val registrationEvent = AdjustEvent("abc123")
registrationEvent.addCallbackParameter("method", "email")
Adjust.trackEvent(registrationEvent)

// Purchase
val purchaseEvent = AdjustEvent("def456")
purchaseEvent.setRevenue(29.99, "USD")
purchaseEvent.setOrderId("order_12345")
Adjust.trackEvent(purchaseEvent)

// Custom event
val customEvent = AdjustEvent("ghi789")
customEvent.addCallbackParameter("plan_type", "premium")
Adjust.trackEvent(customEvent)
Recommended events to track:
| Event | Purpose | Key Parameters |
|---|---|---|
| Registration | User sign up | method |
| Login | User login | method |
| Purchase | Revenue event | revenue, currency, order_id |
| Subscription Start | Subscription begins | plan_type, revenue |
| Trial Start | Free trial begins | plan_type |
| Tutorial Complete | Onboarding done | — |
Step 6 — Configure SKAdNetwork (iOS)
Adjust’s SKAN 4.0 setup is one of the cleanest in the industry.
Configure Conversion Values in Adjust Dashboard:
- Dashboard → Your iOS App → SKAdNetwork
- Click “Conversion Value Schema”
- Map conversion values to your key events:
| CV | Event | Revenue |
|---|---|---|
| 0 | Install | — |
| 1 | Registration | — |
| 2 | Trial start | — |
| 3 | Purchase | $0-$10 |
| 4 | Purchase | $10-$50 |
| 5 | Purchase | $50+ |
Update Conversion Values in Code:
// iOS — update conversion value after key event
Adjust.updateConversionValue(3)// Android — not needed for SKAN (iOS only)Adjust automatically manages postback windows — you don’t need to configure the 3 postback windows manually.
Step 7 — Set Up Deep Links
Adjust’s deep linking handles both deferred deep links (for new installs) and direct deep links (for existing users).
iOS Universal Links:
- Dashboard → Your App → Deep Linking
- Add your domain and Bundle ID
- Add Associated Domains in Xcode:
applinks:yourdomain.adj.stHandle in SwiftUI:
.onOpenURL { url in
    Adjust.appWillOpen(url)
}
.onContinueUserActivity(NSUserActivityTypeBrowsingWeb) { activity in
    if let url = activity.webpageURL {
        Adjust.appWillOpen(url)
    }
}
Android App Links:
<intent-filter android:autoVerify="true">
    <action android:name="android.intent.action.VIEW" />
    <category android:name="android.intent.category.DEFAULT" />
    <category android:name="android.intent.category.BROWSABLE" />
    <data android:scheme="https"
          android:host="yourdomain.adj.st" />
</intent-filter>
Step 8 — Connect Ad Networks
For each active ad network, configure the integration in Adjust:
- Dashboard → Your App → Partner Setup
- Search for your ad network
- Enable the integration
- Enter API credentials
- Configure postback settings
Standard attribution windows:
- Click-through: 7 days
- View-through: 1 day
- Re-attribution: 30 days
Facebook/Meta Setup:
- Enable Meta integration in Adjust
- Add your Meta App ID
- Enable Advanced Measurement for iOS
- Map Adjust events to Meta standard events
Google Ads Setup:
- Link Google Ads account to Adjust
- Import Adjust conversions into Google Ads
- Enable parallel tracking
How Much Does Adjust Cost? (Adjust Pricing 2026)
This is one of the most common questions about Adjust — and the answer depends on your app’s scale.
Adjust Pricing Tiers:
| Plan | Price | Best For |
|---|---|---|
| Free | $0 | Apps under 10,000 MAU |
| Core | Custom | Growing apps, standard attribution |
| Enterprise | Custom | Large-scale apps, advanced features |
What affects Adjust pricing:
- Monthly Active Users (MAU) — primary pricing metric
- Number of attributed events
- Features required (fraud protection, raw data export)
- Contract length
Adjust vs AppsFlyer pricing:
Adjust is generally more price-transparent than AppsFlyer. Adjust charges based on MAU, which is more predictable than AppsFlyer’s install-based pricing. For apps with high install volumes but lower MAU, Adjust can be significantly cheaper.
Key pricing difference:
- AppsFlyer — charged per attributed install
- Adjust — charged per Monthly Active User
For apps with strong retention (users coming back month after month), AppsFlyer’s install-based pricing can be more cost-effective. For apps with high install volumes and lower retention, Adjust’s MAU-based pricing is usually cheaper.
Free tier: Adjust offers a free tier for apps under a certain MAU threshold — making it accessible for early-stage apps and indie developers.
For exact pricing, contact Adjust directly at adjust.com — they provide custom quotes based on your specific volume and requirements.
Step 9 — Validate Your Adjust Setup
Never assume your setup is working. Always validate.
Method 1 — Adjust Testing Console:
- Dashboard → Testing Console
- Add your test device (IDFA for iOS, GAID for Android)
- Trigger events in your app
- Verify events appear in real-time
Method 2 — Adjust Logcat (Android):
Enable verbose logging:
adjustConfig.setLogLevel(LogLevel.VERBOSE)Check Android Studio Logcat for Adjust logs.
Method 3 — Xcode Console (iOS):
adjustConfig?.logLevel = ADJLogLevelVerboseCheck Xcode console for Adjust SDK logs.
Validation Checklist:
- Install event fires on fresh install
- Custom events appear in Testing Console
- Revenue events show correct amount and currency
- Deep links open correct screen
- SKAN postbacks appearing (iOS)
- Ad network integrations showing data
- No duplicate events firing
Common Adjust Setup Mistakes
Mistake 1 — Using Sandbox Environment in Production
Always switch from ADJEnvironmentSandbox to ADJEnvironmentProduction before releasing. Sandbox data goes to a separate dashboard and pollutes your testing environment.
Mistake 2 — Not Setting User ID
Call setUserId() immediately after user login. Without this, you can’t track users across devices or sessions.
Adjust.addSessionCallbackParameter("user_id", value: "user_12345")Mistake 3 — Missing SKAdNetwork IDs
If your Info.plist is missing Adjust’s SKAdNetwork IDs, iOS campaigns cannot be attributed via SKAN. Always download the latest list from Adjust dashboard.
Mistake 4 — Not Using Order ID for Deduplication
Always include setOrderId() for purchase events to prevent duplicate revenue counting.
Mistake 5 — Wrong Attribution Window Settings
Default attribution windows may not match your ad platform settings. Align attribution windows between Adjust and each ad network to prevent discrepancies.
Adjust Setup for Flutter Apps
If you’re using Flutter, use the official Adjust Flutter plugin:
# pubspec.yaml
dependencies:
adjust_sdk: ^4.38.1import 'package:adjust_sdk/adjust.dart';
import 'package:adjust_sdk/adjust_config.dart';
AdjustConfig config = AdjustConfig(
'YOUR_APP_TOKEN',
AdjustEnvironment.production,
);
config.logLevel = AdjustLogLevel.verbose;
Adjust.start(config);
// Track event
AdjustEvent event = AdjustEvent('YOUR_EVENT_TOKEN');
event.setRevenue(29.99, 'USD');
event.setOrderId('order_12345');
Adjust.trackEvent(event);FAQ
How do I get my Adjust App Token? Log in to your Adjust dashboard, select your app, go to App Settings, and copy the App Token shown at the top of the page.
Is Adjust free to use? Adjust offers a free tier for apps under a certain MAU threshold. Paid plans are based on Monthly Active Users and required features. Contact Adjust for custom pricing.
How long does Adjust data take to appear? Install and event data appears in the Adjust dashboard within minutes. SKAN postback data has a delay of 24-72 hours depending on the postback window.
What is the difference between Adjust and AppsFlyer? Both are MMPs that track mobile app attribution. Adjust is known for cleaner dashboards, transparent pricing, and better raw data access. AppsFlyer has more ad network integrations and more advanced fraud protection.
How do I track in-app purchases in Adjust? Create a purchase event in the Adjust dashboard, get the event token, then use setRevenue() and setOrderId() when tracking the purchase event in your app.
Can Adjust track subscriptions? Yes. Create subscription events in Adjust for trial start, subscription start, renewal, and cancellation. For more advanced subscription management, combine Adjust with RevenueCat.
Does Adjust support Flutter? Yes. Adjust has an official Flutter plugin available on pub.dev. It supports both iOS and Android with the same API as the native SDKs.